

How To Clean Dead Animal Bones
My strange and wonderful daughter has an obsession with bones since she was three years old. She even asked me if she could have my bones when I die. I said yes, but since we aren't at that point yet, right now we are gathering all sorts of animal bones and cleaning them. 🙂
Cleaning and whitening animal bones for display is actually fairly simple. Below I'll get into the details of what to do in each step of the bone cleaning process.
Guess what? I wrote an entire eBook about cleaning bones. It covers a lot more than I could fit in this article, including lots of expert tips and hacks that amateurs can use. You can buy it here (instant PDF download) for $4.99!

Get the eBook here
Jump to:
- How to Clean and Whiten Bones
- Step 1: Supplies
- Step 2: Removing Soft Tissue
- Step 3: Precleaning the Bones
- Step 4: Degreasing the Bones
- Step 5: Soaking in Hydrogen Peroxide
- Before/After Pictures
- Tips for Very Large Skulls or Bones
- Trash Bag Trick
- Baking Soda + H202 Paste
- Cream Hair Developer
How to Clean and Whiten Bones
Cleaning small bones is pretty easy. However, it may take some time -especially if the animal is fresh and has lots of soft tissue on it still.
Step 1: Supplies
In order to clean animal bones, you will need the following supplies:
- Gloves
- Buckets or trash cans that can hold the bones being cleaned
- Dish soap
- Scrub brushes
- Hydrogen peroxide
Depending on the type of bones and their condition, you might need some other supplies too, such as as power washer, muslin sack, pliers for removing teeth, and ammonia for degreasing.
Never Use Bleach for Whitening Bones
A lot of articles online about how to whiten bones say to "bleach" the bones. You should NEVER use bleach to get bones white. Why? Bleach will destroy the structural integrity of the bones.
Likewise, you don't want to use any laundry detergents for cleaning or degreasing the bones. These detergents often contain bleach or other harsh chemicals which can destroy the bone.
Use Hydrogen Peroxide to Whiten Bones
Hydrogen peroxide (H2o2) is the safest and most effective way to whiten bones. This is what taxidermists use, including the ones at the Smithsonian and other prestigious institutions.
You can use the 3% hydrogen peroxide found in drug stores to whiten bones. The problem is that this peroxide is very weak. You'll either need to buy a zillion bottles of it or do multiple soaks to get the bones clean and white. To get good results, you want 12% hydrogen peroxide.
Hair Developer As an Alternative to Hydrogen Peroxide
Unfortunately, not many pharmacies stock concentrated hydrogen peroxide in that concentration. If you can't find 12% or higher hydrogen peroxide, you can use hair developer instead.
There are two types of hair developer:
- Clear Developer: This is the exact same thing as the hydrogen peroxide you'd get in a pharmacy. It will bubble up nicely and works great for cleaning bones.Get 40 volume clear developer here.
- Cream Developer:This has some emulsifiers added so it is creamy and thick. Some hardcore taxidermists won't use it, saying the emulsifiers could mess up the bones. It also won't bubble up like clear H202, so it isn't as good at getting stains out from deep within bones. However, because cream developer is thick, it can be painted directly onto bones for spot whitening or for whitening skulls with antlers.Get 40 volume cream developer here.
Hair Developer Strengths:
Hair developer is listed in strengths by volume. Don't think that 10v equals 10% though. The actual concentrations are as follows:
- 10 volume =3% hydrogen peroxide.Don't get this. It's too weak for good results!
- 20 volume =6% hydrogen peroxide.
- 30 volume =9% hydrogen peroxide.
- 40 volume =12% hydrogen peroxide.
You can buy 12% hydrogen hair developer (40v) on Amazon here. It's the cheapest I've found and the strongest hydrogen peroxide you'll likely find unless you happen to have a hookup at a pharmacy.

This giant bottle of hair developer (hydrogen peroxide) is 12% and is really affordable for a gallon. Buy it here.
Step 2: Remove soft tissue

If you found a bone that has been sitting in nature for a long time, then it won't have any soft tissue on it. You'll be able to skip this step. But, if you are dealing with fresh kills or roadkill, you'll have to remove all the tissue before proceeding to whitening.
There are 6 main ways of doing this. I'll go over them briefly here. For more detailed instructions, read this post on how to remove soft tissue from bones.
Method 1: Maceration (Soaking)
This invovles soaking the bones in water for weeks or even months. The water softens tissue and microbes in the water eat away at tissue. It's very effective at removing hidden tissue in skulls without damaging them.
Method 2: Burying
When you bury bones, microbes in the dirt will eat away all the tissue. This is great for rotting carcasses, or if you are squeemish and don't want to deal with stinky, gross tissue. The only main problem is that you can easily lose bones in the dirt, especially from small animals .
Method 3: Insects/Leave in the Open
You can just put the carcass outside and insects will eat away the tissue. You have to put the carcass in some sort of cage to protect it from scavengers.
Method 4: Corpse in a Box
With this method, you put a small corpse in a box that has holes in it. Insects will get to the carcass and eat away the tissue.
Method 5: Simmering
If you have a fresh kill with all of its tissue on it, simmering (not boiling) will loosen tissue so you can scrape it off.
Method 5: Steaming
Small carcasses can be put in a steamer. The steam will loosen tissue without damaging the bones.
Boiling: NOT Recommended
Despite what a lot of websites say, you shouldn't boil bones to remove tissue. Boiling can damage bones and trap fat inside of them.

Isabel got this pig skull as a gift. It was boiled so got all gross, yellow and shiny from the fat that got trapped in it. It was HELL to degrease!!!! Lesson? DON'T BOIL BONES!
Step 3: Pre-clean the bones
This applies to bones you have found which do not have any soft tissue on them, but are caked with dirt and maybe have moss growing on them.
Use soapy water and the toothbrush to SCRUB the bones clean. The cleaner they are when you start, the better the hydrogen peroxide will work.

This gives a new definition to brushing your teeth!
Step 4: Degreasing
Degreasing is one of the most confusing steps in cleaning animal bones. It involves soaking bones in a solvent (like dish soap) to remove fat.
How do you know the bones need to be degreased? You'll need to degrease if:
- The bones are yellow, clear, or shiny
- The bones stink, even after all tissue has been removed
- If the bones are from certain animals like: bears, pigs, boars, possoms, or seals.
It can take months for all the grease to get out of bones. If you skip this step though, the fat can slowly leach out of the bones and turn them yellow over time. They might even start to rot!
For more detailed instructions, read this post on How to Degrease Animal Bones.

Check out how greasy this possom skull is! It had to be thrown away because the fats started rotting the bone.
Step 5: Whiten with Hydrogen Peroxide
Once the bones are completely free of tissue and have been degreased, you are ready to whiten them. You'll need hydrogen peroxide for this. As I said before, never use bleach for whitening bones. It will destroy them by making them flaky and brittle.
Here's how to do it:
- Put the bones in your bucket.
- Pour in your hydrogen peroxide.
- Then top it with water.
- The bones will start foaming, which means the hydrogen peroxide is working. Hydrogen peroxide also heats up when it is working.
- Loosely cover the bones while they soak. The H202 will stay active longer this way.
- Let the bones whiten for about 24 hours. Repeat if necessary.
How much hydrogen peroxide to use?
I usually use a ratio of 1:3 hydrogen peroxide to water. However, the higher the concentration of hydrogen, the faster and whiter your bones will be.
Tip:Try to find a container which fits your bones exactly. Then you won't have to use as much H202 to cover the bones. If you can't find a suitable container, you can use this pro trick:
- Line the container with a heavy-duty trash bag
- Put the bone in the trash bag
- Fill the container with water. The water will fill the space around the bone in the bag.
- Now pour the hydrogen peroxide into the trash bag.
Remember that hair developer works just the same as hydrogen peroxide. You can buy it in bulk here.

Adding peroxide to the bones

The peroxide is starting to foam!
How long to let bones whiten?
In general, I soak bones in hydrogen peroxide for 24 hours. This is usually long enough to get them white to my liking.
It's important to note that I'm not going for pure white. If you want your bone specimens to berealllly white, then you'll have to do several rounds.
*Note about Cleaning Very Dirty Bones
I once made the mistake of not adequately cleaning a very dirty bone. The hydrogen peroxide went crazy on it! It started steaming and got HOT. I thought it was going to melt the plastic bag it was in!!! You can see in the picture all of the steam coming off the bone.
The message? Make sure you do a really good job of scrubbing dirt off the bones before soaking in hydrogen peroxide!

Check out the steam coming off this dirty bone!
Before/After Pictures
These pictures should give you an idea of what realistic results you can expect when whitening bones with hydrogen peroxide. As I mentioned, you can do multiple soaks in H202 to get them whiter.
Dog Skull
Here's a giant dog skull that a friend found for me. It had been sitting in the woods for a long time and was very dirty. I did one soak in 40v hair developer to get it whitened.

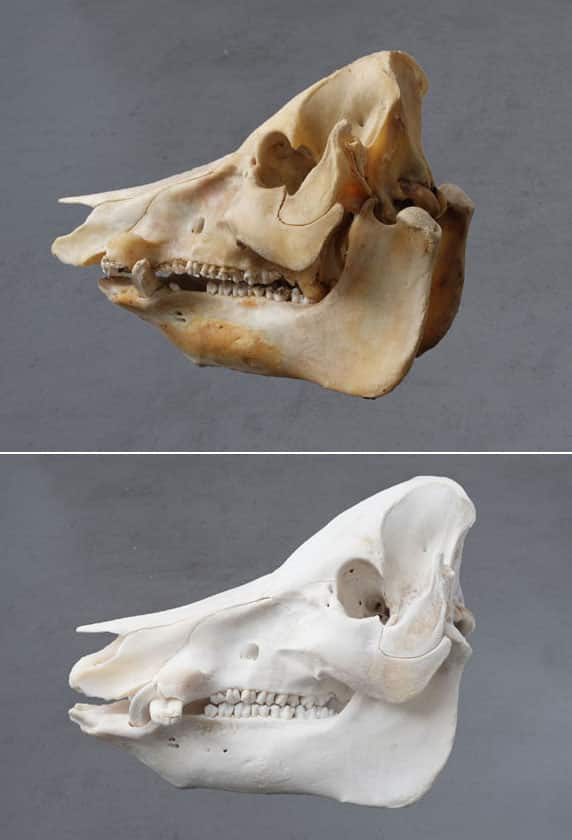
Greasy Pig Skull
This pig skull was given to us as a present. It had been boiled to remove the tissue (which is a bad idea!) so there was tons of fat trapped in the skull. I had to degrease it for 2 months and then whiten it before it got to this state.
A Very Dirty Hip Bone
This hip bone was found in a river and was covered with dirt and moss. Considering how dirty it was when I found it, the bone came out nice and clean.

Cat Skull
This old cat skull was found in the woods and soaked in 40v hair developer for 24 hours.

Vertebrae:
This vertebrae stunk like crazy from all the fat trapped in it (notice the shiny parts on the before photo). I degreased it in acetone and then did a hydrogen peroxide soak. It came out nice and white.

Tips for Very Large Skulls or Bones
One of the first large skulls I cleaned and whitened was a cow skull. Isabel's friend found it for her (what other 6 year old is lucky enough to have a friend who saves bones for her?). The skull was free of soft tissue, but was still really dirty and stunk badly. I didn't realize it smelled so badly until halfway home on the bus. Sorry to all the people who had to put up with the rotting smell on the 30 minute bus ride! 😮
Cleaning such a large skull presented some problems:
- I literally could not find a plastic container large enough for soaking the skull. Not even laundry baskets were wide enough to fit it.
- I would have had to use TONS of hydrogen to immerse the bone. I'm not a rich person and wasn't thrilled about spending $50+ on peroxide for a skull.
Luckily, there are some solutions for these issues.
Trash Bag Trick
Here's a pro trick to use less hydrogen peroxide when whitening large skulls:
- Fill a trash can with water
- Then put the skull in a sturdy plastic bag into the water.
- Pour your hydrogen peroxide/water solution into the trash bag.
- Since the water fills the empty space around the skull and pushes on the bag, you won't need as much hydrogen peroxide to emerse the skull.
Unfortunately, I didn't know about this trick or have a trash can large enough to hold my cow skull. So, I put the skull into a big trash bag, poured in some hydrogen and water, and then tied off the bag. I kind of propped everything up in a plastic drawer.
Of course the trash bag sprung a leak. The peroxide pooled at the bottom, so only part of the skull got whitened. You can see a line on the skull from the part which was sitting in the most hydrogen solution. It looks terrible!

Notice the whiter line from my first attempt at cleaning the skull.
Baking Soda + Hydrogen Peroxide Paste
Baking soda is a natural cleaning agent, right? Could I mix it with hydrogen peroxide to form a paste, and then spread the paste on the bone?
I did a small test batch. The baking soda and hydrogen foamed a bit when mixed up, but still formed a paste that could be spread onto the skull. *You can buy cheap hydrogen peroxide here.

This is the paste I made from baking soda and hydrogen peroxide. It was about as thick as toothpaste.
The great thing about the paste method is that you don't have to use lots of hydrogen peroxide and it can be spread in all those weird nooks and crannies skulls have. The only annoying thing is that you will have to do at least two rounds – one for the top of the skull and another for the bottom.

Applying the paste to the skull. It started foaming quickly, but the paste didn't fall off.
Here you can see what it looked like afterwards. A huge difference!

Paint On Cream Hair Developer
As I mentioned before, cream hair developer has emulsifiers added to thicken it. What's cool about this is that you can paint it directly onto bones. There's no need to mix it with baking soda to thicken it! After applying, cover the bones with plastic wrap. Otherwise the cream developer will dry out too quickly.
Like with the baking soda paste, this method also won't clean the interior of the skull. Make sure your skull is completely clean of tissue before you try to whiten it by painting on cream developer.

Pig skull with cream hair developer painted on it.
Want more tips on how to clean bones?
Have questions about antlers, horns, beaks?
Want to know how to glue together bones?
These are all things I talk about in my eBook. Get it here for $4.99.
How To Clean Dead Animal Bones
Source: https://momgoescamping.com/how-to-clean-animal-bones-hydrogen-peroxide/
Posted by: gainesspor1977.blogspot.com
0 Response to "How To Clean Dead Animal Bones"
Post a Comment